Pages

Thursday, March 28, 2013

(Another) Smock and (Another) Bonnet

Sometimes sewing something you made about 8 times already is just what you need. You don't have to think, you know it will fit, you know it works and you don't have to read the instructions. This pattern is in Ottobre 1/2008 and I have made quite a few of them and they have all been worn and worn.
 I used piping in between the pieces. I really like the finish of it, but it is quite firm piping and so it makes the top sit out from the body like a hoop on a dress.
I used my new piping foot (Bernina 12C) which I'll admit wasn't dirt cheap, but so much easier to use than the zipper foot and gives a lot nicer finish. I really like to use piping, but have been avoiding it because I never enjoyed sewing it. So now I can sew piping on everything!

 I had 1/2 a yard of this fabric and cut it really carefully so I could get another bonnet out of it. There was just enough for the outside so I used a different fabric for the inside, the tie and the facing on the smock.


Wednesday, March 27, 2013

Layer Cake Tutorial #3

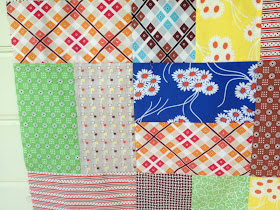
Time for another easy Layer Cake Tutorial. I loved the line Katie Jump Rope by Denyse Schmidt and used it for a couple of cot quilts I sold at markets. I rediscovered twenty 10" squares in my recent craft room clean up.
Once again a really easy quilt that hardly needs a tutorial, but if you do this is how I made it.
Cut each square down the middle into two rectangles 5" x 10". Then cut 1/2" from the end of each rectangle so you have 2 rectangles 5" x 9 1/2".
Pair up all the rectangles. I like to make pairs out of contrasting fabric, but it would also look good if you made blocks that were similar, eg two different blue fabrics together.
Sew each pair together along the long edge and press. I pressed them all to the side, but press open of you prefer. Your blocks will measure 9 1/2" square.
Organise into five rows of four blocks, turning every second block as shown. Sew the blocks into rows and press. Sew the rows together and press.
Now you have a finished quilt top! 


Tuesday, March 26, 2013

Stock for Fremantle and Fabricworm

This little lot and a few other friends are on there way to the Fremantle Arts Centre so if you are after any of my toys or any other fantastic West Australian made things head that way. They have such an amazing shop there full of pottery, textiles, jewellery and many many other things. One of my favourite place to buy presents.
 It was a lovely mail day yesterday. This lovely stack of fabric arrived from Fabricworm. It is always so lovely to see fabric in real life after admiring it online.

Monday, March 25, 2013

Freedom Side Table

The best way to describe the twins room most of the time is 'a bit of a disaster'. Every surface seems to be covered in lego, hair elastics and 'special collections' of whatever they are collecting that week. My Mum gave them a lamp for Christmas and it has either been on the floor or perched on a chair. Luckily I recently won a side table from Freedom from the lovely Cinti of My Poppet. Perfect! It fits the lamp, some books and their torch and it is a great shade of pink which the girls love and a little bit of their room is neat and tidy. I think I might need to get another one for Eva's room. 

Sunday, March 24, 2013

In Progress


Too may things on the go here, I can't see the cutting table and there are piles all over the floor again, but when I get an idea I can't help starting something new.
Another hat for Olive, because from experience I know that babies can never have too many hats. 
 Some test sewing.
 A muslin of a shirt for Chris, hopefully a wearable one. I'm using the nice lawn from Spotlight. I really want to make him a Liberty one, but we can't seem to agree on a print. I know there is one out there that is perfect, we just can't seem to find it.
 The most exciting part of the weekend - a chook shed! My Dad has been making this for us at the farm. Made completely from things in his shed, out the back of the shed or from the tip. Nothing new was needed. Completely fox proof, with a perch and windows to collect the eggs and pretty easy to see hiding snakes in summer. And my fantastic Dad put it on a trailer and towed it here for us. The perfect chook shed! Of course Eva had to check it out. She has been clucking and pretending to be a chicken all day.

Wednesday, March 20, 2013

Layer Cake Quilt Tutorial #2

I've had this fabric in my stash for a couple of years and I have pulled it out a few times and have not been able to make a decision about what to do with it. I really love it, but it is slightly crazy and completely outside of the colours I normally sew with. I finally realized it needed something simple. And there is nothing simpler than 5" squares sewn together.
 
It feels completely ridiculous calling this a tutorial as all you have to do is collect twenty 10" squares. I organized them into piles of 4 so you only have to cut 5 times instead of 20. I find if I try to cut more then my cutting is not as accurate.
 Then cut them all up into 5" squares. Organize them into 10 rows of 8 squares per row and sew them back together.

 It could only be quicker and easier if you just sewed the 10" squares together in 5 rows of 4.


Monday, March 18, 2013

Shot Cottons and Liberty


Another quilt from the layer cake tutorial I did last week.
For this one I used 2 cream squares and 2 squares of Kaffe Fassett shot cotton for each row. After I laid out the quilt I removed one coloured rectangle from each row and replaced it with a rectangle of Liberty lawn.
I love this combination. I'm not sure how you can go wrong mixing shot cottons and Liberty.


Friday, March 15, 2013

Good Finds

I never seem to have much luck op shopping. I find the odd book I want now and then or some nice old cups or plates. Because I never seem to find anything I don't tend to go that often. Today as I drove past I found myself thinking I really did need to go in. So I doubled back and this is what I found. I have wanted one of these since I was about 8  or 9. I think it has only missing one plate and it cost me a whole $2. I can't promise, but I  might even share it with the girls.

 I also found some great patterns and a couple of books on Machine Knitting. This  lot cost $4.50.

I also had another great find this week in the little old school craft shop in town. I love this shop it is not very big, but I usually find exactly what I need in there and also things I don't know that I need. The ladies are lovely and very helpful. Yesterday I found this snap setter. I tried it last night and it worked perfectly!

Thursday, March 14, 2013

Easy Embroidery

I do love a 1970s craft book. Especially embroidery books. I was doing a bit of ebay surfing with non sleeping Olive in the middle of the night recently for Lis Paludan books. I favourited a few and the next morning the price on one had jumped from a couple of dollars to over $200. Yikes. I'm pretty sure it is still for sale at that price. I bought this for under $10 with postage.
There aren't many coloured photos, but I love the ones that are in there.


There are some great black and white ones too.
Lots of excellent black and white one illustrations and diagrams. Lots of inspiration for quilts and printing on fabric.


Wednesday, March 13, 2013

Little Grey Hat

All of a sudden the nights have turned a little chilly. It was 5 degrees this morning. Poor little Olive didn't have any hats that fit so I thought I should knit one. I used some Sublime merino dk and made it up as I went. A picot edge, some eyelets and I made it a little big so it will fit for a while. I used a scrap of Liberty fabric to make the ribbon.
I made notes as I went. I might make another one, double check what I did and then post the pattern here when it is finished.


Sunday, March 10, 2013

Rashies and Bathers

I wasn't really planning on any rashie/bathers/swimsuit sewing but the girls really needed new ones and it is nearly impossible to find them at this time of the year.
Kwik Sew 3785 is one of the few patterns I found in print. I couldn't find any rashie patterns in print, but found Kwik Sew 2889 on ebay.
This is a very easy pattern. I used plain lycra/spandex fabric and used the overlocker to sew them up I only used the sewing machine to top stitch the hems. I made the smallest size, the size 8, for the twins. I could have added an inch or so to the length, but otherwise they fit well. I made the same for Evie as she measures the same size around the waist and chest.
For the bathers/swimsuits I made the size M for the twins and a S for Evie. This is not a difficult pattern, but I can't say I really enjoyed it. I am not a fan of adding all that elastic to the neck, arms and legs, but I do like the result. I didn't line them because I had no lining and they really needed them now, but I think I will buy some so I can line them next time.
The fabric on the left was an ebay find, the middle one was from Etsy and the end one was a great Spotlight find last year. They all feel a little different so it will be interesting to see how well they wear.
I did a little bit of a search around ebay and found an old Kwik Sew pattern - 154 for sizes 2-6 and Kwik Sew 2680 for rashie sizes 1-4. I snapped those up as they will be great for Olive over the next few years.

Tuesday, March 05, 2013

Layer Cake Tutorial #1


I am pretty sure babies can never have enough little quilts. I have them in the car, pram, cot and several I use on the floor. I like to have a little stack ready to give as presents when friends have babies. The present box is empty at the moment so I thought I would fill it up using some of the half layer cakes and 10" squares I have in my stash.
This one was inspired by some of the Quilts of Gees Bend and 'Hop, Skip & A Jump' by Denyse Schmidt.

 Organise the twenty 10" squares into five groups of four.
 Stack one group (4 squares) so all the edges line up and use a rotary cutter and a ruler to cut into 4 sections. Vary the widths, they can be anywhere between just over an inch and 4 inches wide.
 Arrange all the strips into a row any way you want. Don't overthink this, I only had one rule and that was 2 strips of the same fabric couldn't be next to each other.
 Sew them together and press the seams. I pressed mine open.
 Make another  4 rows in the same way and then sew the rows together.
Your quilt top is finished!
I'm not sure how I will quilt mine yet. I am going to wait until I have a few to do and then wait until I am in a quilting mood and do them all together.